
まずは、前回のChatGPTによるStep-by-step guideをここに再掲します。
🛠 Step-by-Step Guide
Step 1: Create a Remote Repository on GitHub
- Go to GitHub and log in.
- Click on the “+” in the upper-right corner and select "New repository".
-
Enter a repository name (e.g.,
my-documents-repo). - Set the repository to Private.
-
DO NOT initialize with a README or
.gitignore(this avoids merge conflicts). - Click Create repository.
- GitHub will show you commands for connecting your local repository—keep this tab open.
Step 2: Initialize Your Local Repository
- Open Git Bash (or VS Code terminal).
- Navigate to your local Documents folder:
-
Initialize Git in the folder:
This creates a hidden
.gitfolder, marking it as a Git repository.
Step 3: Connect Your Local Repository to GitHub
-
Add the GitHub repository as a remote (replace
<your-username>and<repo-name>): - Verify the remote repository was added: You should see:
Step 4: Stage, Commit, and Push Files
-
Check your files:
You should see untracked files in red.
-
Add all files to tracking:
-
Commit the files with a message:
-
Push to GitHub:
If
maindoesn’t exist, rename your default branch tomainfirst:
1.Documentsフォルダをlocal Repositoryにするのをやめる
前回は、Step 2までやったのですが、PCの動きが変になっていました。Documentsフォルダにはものすごくたくさんのファイルが置かれており、その全体をlocal Repositoryにしたせいかもしれないので、.gitを取り除きました。
そこで、その代わりとして、Documentsフォルダの中に、Repositoryを作ることにしました。まず
Documents > GitHub というフォルダを作り、さらにその下に Documents > GitHub > privateDocumentsRepo というフォルダを作りました。それがいいのか悪いのかわかりませんが、GitHub上に作ったRepositoryと同じ名前にしました。
Step 1で作ったGitHub上のprivateDocumentsRepoというrepositoryはそのままです。新たにlocal repository用のフォルダを作ったので、これについて、Step 2の作業を再度行います。まず、PC上すなわち、GitBashまたはVS Codeのterminalで、
Documents > GitHub > privateDocumentsRepo
を開きます。次に、
git init
を打ってenter keyを押します。(VS Codeでやりました。)
Initialized empty Git repository in C:/Users/myfolder/Documents/GitHub/privateDocumentsRepo/.git/
との表示がなされたので、どうやらうまくいったようです。確認のため、
Get-ChildItem -Force または gci -Force または ls -Force
を打って、.gitを表示させました。なお、GitBashなら、
ls -la
と打つところです。
local privateDocumentsRepoは空っぽなので、VS Codeで、FirstCode.pyというファイルを作り、
print("Hello, world")
という1行だけのPython Codeを書いておきました。
VS Codeの画面左側のファイル欄のFirstCode.pyの右には、Uという文字が表示されています。したがって、今作ったファイルは、Untrackedの状態になっています。

ひとまず、これで、Step 2まで完了です。
2.Step 3
ようやくStep 3です。まずは、Step 3 - 1です。次のコマンドの<your-username>と<repo-name>をStep 1で作ったものに置き換えて、実行します。GitBashまたはVS Codeですが、VS Codeでやってみました。ここで注意すべきは、localのprivateDocumentsRepoの中に入ったうえで、これを実行することです。
git remote add origin https://github.com/<your-username>/<repo-name>.git
ChatGPTの書きぶりからして、このコマンドは、local repositoryに、remote repositoryのURLを書き加えるもののようです。つまり、local repositoryがremote repositoryにアクセスできるように、local repositoryの中に、remoteのURLを書き込んでおくのだと思われます。
Enter keyを押してみたら、特にerror messagesも何もでませんでした。そこで、Step 3-2 verifyに移ります。
git remote -v
を打って、所定のメッセージが出るか見てみます。出ました:
origin https://github.com/<your-username>/privateDocumentsRepo.git (fetch)
origin https://github.com/<your-username>/privateDocumentsRepo.git (push)
fetch用のURLとpush用のURLがともに表示されました。fetchというのはcome after and take backの意味なので、
fetch = to take a file from the remote repository
push = to put a file to the remote repository
という意味だと解釈できます。
これでStep 3は完了です。完成までもう一息です。
3.Step 4
とうとうStep 4です。
(1) まずは、Step 4-1:
git status
を打ちました。すると、次の表示が出ました。
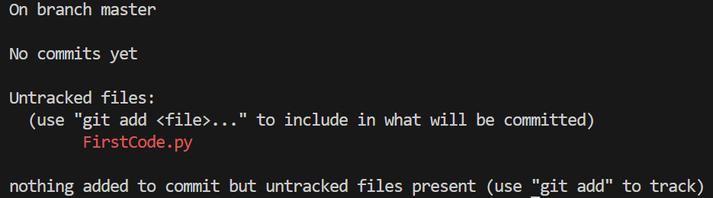
つまりは、
branch masterにおいては、commitsであるファイルはなく、Untracked filesであるFirstCode.pyのみあり、commitには何も追加されておらず、untracked filesのみある。
との内容らしいです。説明どおり、Untracked fileは赤字で示されています。
(2) 次に、Step 4-2です。
git add .
これはどうやら、. すなわち、current folder内のすべてのファイルをaddする、すなわち、trackedの状態にするもののようです。個別のファイルをaddしたいのなら、
git add <file name>
とします。FirstCode.pyのみaddすればよいので、
git add FirstCode.py
と打ちました。しかし、何も表示がでません。そこで、確認として、
git status
と打ちました。すると、次のような表示になりました。
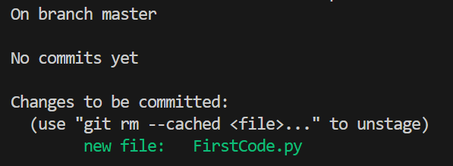
赤い字が、緑色になって、
Changes to be committed:のファイルとして、FirstCode.pyが記載されていました。これは、つまり、FirstCode.pyはStagedの状態になったということです。
また、画面左側のfile listには、FirstCode.pyの横のUという表示が、Aに代わっていました。

この表示によれば、FirstCode.pyをUnstagedして、Untrackedの状態に戻すには、
git rm --cached <file>を打てばよいようです。そこで、
git rm --cached FirstCode.py
と打ってみました。

つまり、stagedのリストの中から、FirstCode.pyはremoveしたという意味なのでしょう。左側のfile listのFirstCode.pyの横のAは、またUに戻っていました。すなわち、Untrackedに戻りました。
今度は、
git add .
でstagedさせてみます。うまくいきました。FirstCode.pyの表示はAとなり、また、git statusで調べると、Changes to be committed:の下に、ちゃんと、FirstCode.pyが記載されていました。
(3) Step 4-3です。
git commit -m "Initial commit"
この中の、-mは、messageで、 "Initial commit"はそのメッセージの内容だと考えられます。2回目のcommitなら、"Second commit"などとすればよいです。また、このコマンドは、stagedされているfilesをすべて、commitするので、特にファイル名の記載はないようです。これを打ったら、次のような表示が出ました。

まず、master(root-commit)は、privateDocumentsRepoのことを言っているのだと思います。7e1lecc1は、アドレスでしょうか。Initial commitは先ほど書いたメッセージです。これについて、Step 4-4に行く前に、ChatGPTにもう少し詳しく聞いてみます。
4.git commit -m "Initial commit" (Step 4-3)の結果メッセージの意味
I committed a file with the command:
git commit -m "Initial commit"
and I got the following message. Can you explain each line of the message?
[master (root-commit) 7e1ecc1] Initial commit
1 file changed, 1 insertion(+)
create mode 100644 FirstCode.py
Certainly! Here’s what each line of the message means:
Line 1:
-
[master] → This indicates that you are on themasterbranch (the default branch in many Git repositories). -
(root-commit)→ This means that this is the first commit in the repository, also known as the root commit. There are no previous commits. -
7e1ecc1→ This is the unique identifier (commit hash) for this commit. -
Initial commit→ This is the commit message you provided with-m "Initial commit".
Line 2:
-
1 file changed→ This indicates that one file was modified (or in this case, added). -
1 insertion(+)→ This shows that one new line of content was added. Since this is the first commit, all lines in the file are considered as "inserted."
Line 3:
-
create mode 100644→ This refers to the file permission mode in Unix.-
100644means:-
100→ It's a normal file (not a directory or executable). -
644→ The file is readable and writable by the owner, and readable by others.
-
-
-
FirstCode.py→ This is the name of the newly added file.
In summary:
Your commit added a new file (FirstCode.py) to the repository, and this was the first commit in the project.
Let me know if you need further clarification! 😊
I'm going to summarize the above explanations.
- [master] →the master branch
- (root-commit) → the first commit
- 7e1ecc1 → the unique identifier (commit hash) for this commit
- Initial commit → the commit message
- 1 file changed → one file was modified
- 1 insertion(+) → one new line of content was added
- create mode 100644 → the file permission mode in Unix: 100 → It's a normal file (not a directory or executable), 644 → The file is readable and writable by the owner, and readable by others
- FirstCode.py → the name of the newly added file.
上のIn summaryの項目で、Your commit added a new file (FirstCode.py) to the repositoryと言っていますが、それ以前に、privateDocumentsRepoというrepositoryにもともとFirstCode.pyが入っていたのに、なぜadded a new file to the repositoryと言うのか、疑問に思い、これについても聞いてみました。
Where did I add FirstCode.py? Before committing, I had FirstCode.py in my repository (privateDocumentsRepo). After committing, I still have FirstCode.py in my repository (privateDocumentsRepo). What was changed?
Good question! When you ran git commit -m "Initial commit", you didn’t move or copy FirstCode.py anywhere—it stayed in your repository (privateDocumentsRepo). However, what changed was its state in Git’s version control system.
What Happened When You Committed?
-
Before Committing:
-
FirstCode.pywas in your working directory (your repository folder). -
You likely ran
git add FirstCode.py, which moved the file into the staging area (also called the index). - At this stage, Git was tracking the file, but it wasn’t permanently saved in the repository yet.
-
-
After Committing:
-
The commit saved a snapshot of
FirstCode.pyin Git’s history. -
FirstCode.pyremains in your repository folder, but now Git knows that this version belongs to a specific commit (7e1ecc1). -
If you ever modify
FirstCode.pyin the future, Git will recognize the changes and allow you to track them.
-
The commit saved a snapshot of
What Was Changed?
-
Git's internal database now tracks
FirstCode.pyat this point in time. - The repository now has an official commit history.
-
If you run
git log, you'll see this commit in the history.
What Did Not Change?
-
FirstCode.pywas not moved to a different location. -
The contents of
FirstCode.pyitself did not change (unless you modified it before committing).
Would you like to explore how to check the commit history or track changes in the future? 😊
これによれば、the commit historyを知るためには、
git log
を打てばよいとのことです。このコマンドを打ってみましたら、次のような表示が出ました。
commit 7e1ecc1... (HEAD -> master)
Author: [myID] <myAddress>
Date: Sat Mar 1 16:04:10 2025 +0900
Initial commit
でも、これでは、何がcommittedされているかわかりません。それもChatGPTに聞いてみました。
しかし、main branchからかなり外れてきたので、これについては、次の機会に述べることとし、次のStep 4-4に行くことにします。
5.Step 4-4
Step 4-4をもう一度ここに書き写します。
bash
git push -u origin main
If main doesn’t exist, rename your default branch to main first:
bash
git branch -M main
このgit pushというコマンドは、local repositoryにcommitしたファイルをremote repositoryに保存するコマンドです。mainが存在しなければ、default branchをmainという名前に変えてから、git pushをやるよう書いてありますが、では、mainが存在するか否かはどうやってしらべるのでしょうか。その辺のことも含めて、もう少し広く、ChatGPTに聞いてみました。
I ran:
git commit -m "first commit"
Should I run the following two lines of code before running: git push -u origin main?
git branch -M main
git remote add origin https://github.com/myID/privateDocumentsRepo.git
It depends on whether you've already set up the branch and remote repository. Here’s how to check:
Scenario 1: You haven't set up the branch and remote yet
If this is your first time pushing the repository to GitHub, then yes, you should run both commands before
git push -u origin main.
Run the following:
Scenario 2: You already have a "main" branch and remote repository
If you've already set up the remote and branch, running git branch -M main and
git remote add origin ... again is unnecessary.
To check:
-
Run:
-
If it lists
originwith your GitHub repository URL, you don’t need to rungit remote add origin ...again.
-
If it lists
-
Run:
-
If it shows
main, you don’t need to rungit branch -M main.
-
If it shows
In this case, just run:
Scenario 3: You mistakenly added the remote twice
If you accidentally added origin twice, Git will complain. You can fix it by removing the existing remote and adding
it again:
Let me know if you need help checking your setup! 😊
これによれば、git pushをやる前に、
git remote -v
により、originのURLがaddしてあるかどうかがわかります。addしてない場合には、
git remote add origin https://github.com...
により、originのURLをaddします。
さらに、
git branch
により、mainというbranch名になっているかを確認します。そうでない場合には、branch名をmainに書き換えるためのコマンド
git branch -M main
を実行します。
今回の場合、1つめのコマンドは、問題なしでしたが、2つめのコマンドでは、

と表示されました。mainではなくてmasterというbranch名ということですが、このままではダメなのか、いちおうChatGPTに聞いてみました。
When I ran: git branch, I got: master. What should I do? Do I have to change the branch name to main?
Since your current branch is master, but GitHub defaults to main, it’s a good idea to rename your branch to main for consistency. Here's what you should do:
Steps to Rename master to main
-
Rename the branch:
This renames
mastertomain. -
Verify the branch name:
It should now display
main. -
Set up the remote repository (if not already done):
(Skip this step if
git remote -valready shows your repository.) -
Push the renamed branch to GitHub:
This sets
mainas the default upstream branch on GitHub.
Alternative: Keep Using master
If you don’t want to rename the branch, you can just push it as master:
But if GitHub already expects main, you might need to adjust settings later.
Let me know if you need help! 😊
ChatGPTの回答は、masterのままでも可能ではあるが、後のことを考えると、mainに変えた方が無難だというものでした。そこで
git branch -M main
を実行します。さらに、
git branch
で名前が変わったかどうか確認します。git branchで

と表示されたので、branch名がmasterからmainに変わったことが確認できました。
ようやく、Step 4-4のコマンドです。
git push -u origin main
これで、remote repositoryのprivateDocumentsRepoにFirstCode.pyが保存されるはずです。
6.確認
remote repositoryにFirstcode.pyが保存されたかどうか確認したところ、ちゃんと保存されていました。これをどうやって、今度は、remote repositoryからlocalに取り込むか(fetch)、あるいは、localでのversion controlとして、とうやって古いversionに戻したり、新しいversionと比較したりするかの問題がありますが、それはまた今度にします。
最後に、現在、FirstCode.pyはtrackedされた状態なのですが、これをuntrackedの状態、すなわち、Gitに管理されない状態に戻すには、どうするか、その場合、remote repositoryはどうなるかについて、ChatGPTに聞いてみたので、それを記載しておきます。
How can I untrack a tracked file?
If you want to untrack a file that is already being tracked by Git (meaning it was added and committed before), follow these steps:
1. Remove the File from Tracking but Keep It Locally
If you want to remove the file from Git but keep it in your local directory, use:
🔹 Example:
This will stop tracking myfile.txt, but the file will remain in your
local directory.
Then, commit the change:
2. Remove a Directory from Tracking
To remove an entire directory from tracking but keep it locally:
Then, commit the change:
3. Ignore the File in Future Commits
If you don’t want Git to track this file again in the future, add it to .gitignore:
Then, commit the change:
4. Remove the File from Tracking and Delete It Locally
If you want to remove the file from both Git and your local system, use:
Then, commit the change:
Let me know if you need more details! 🚀
これによれば、trackedされているfilesをuntrackedにするには、2つのコマンドを使います。
git rm --cached myfile.txt
git commit -m "Untrack myfile.txt"
つまり、trackするリストからmyfile.txtをremoveして、それをcommitします。
では、この場合、remote repositoryはどうなるのでしょうか。
What happens to the remote file if I untrack my tracked file locally?
If you untrack a tracked file locally using git rm --cached
filename, here's what happens to the remote file (the one on GitHub or another remote repository):
Scenario 1: You Untrack the File Locally but Do Not Push
- The file is removed from tracking in your local repository.
- However, nothing happens to the remote repository until you push.
- The file is still in the remote repository as it was before.
Scenario 2: You Untrack the File and Push the Change
- Once you push, Git removes the file from the remote repository because it's no longer tracked.
- Other collaborators who pull the latest changes will also see the file removed from their repositories.
-
However, the file remains on your local disk (unless you use
git rmwithout--cached).
Scenario 3: You Untrack and Add It to .gitignore
If you add the file to .gitignore after untracking it, Git will not
track it again:
- The file is removed from the remote repository after the push.
- Git will not track it again, even if it changes in your local repo.
Key Takeaways
-
Untracking (
git rm --cached) only removes the file from Git tracking, not from your local system. - If you push after untracking, the file gets removed from the remote repository.
- Other collaborators who pull the changes will see the file deleted from their repositories.
- If you don’t push, the file remains in the remote repository as before.
-
Adding it to
.gitignoreprevents Git from tracking it again in the future.
Let me know if you need more clarification! 🚀
ここでの結論は、pushしない限り、remote repositoryは変化しない、ということでした。
ただし、ここで作ったFirstCode.pyは当面の間、trackedしておく予定です。